TLDR
Quite often I find myself on the go, in need of storing/sharing files on a local network with others without an accessible internet connection. Even with an internet connection, I find myself wanting to keep most of my file sharing local, to prevent storing sensitive data in the cloud (Infamous Cloud Security Breaches). To fix this problem I created the SUBZero (Secure USB Backup Zero), a DIY Wireless USB NAS (Network Attached Storage) that enables you to securely upload files on the go using a $10 Raspberry Pi Zero W! NAS is a low cost, convenient way to backup files, photos, and data for future use. The SUBZero was not intended to replace traditional USBs but offers features that you wouldn’t typically find on a COTS USB.
Features
- Wireless NAS
- Access Point with configurable WPA2 authentication
- Full TCP/IP on the local SUBZero network
- Can act as a wireless router, but can also be used completely offline
- IP Masquerading
- Removable/replaceable SD card. This allows you to buy either a large or small SD card depending on your own needs.
- Easy to use HTTPS File Server
- Built with a $10.00 Raspberry Pi Zero W running Raspbian Stretch Lite. This fares better than a traditional USB in some cases because the SUBZero is also a fully functional computer.
- Can be run/powered by your phone using a USB to USB-C/Lightning/Micro-USB/etc adapter
How it Works
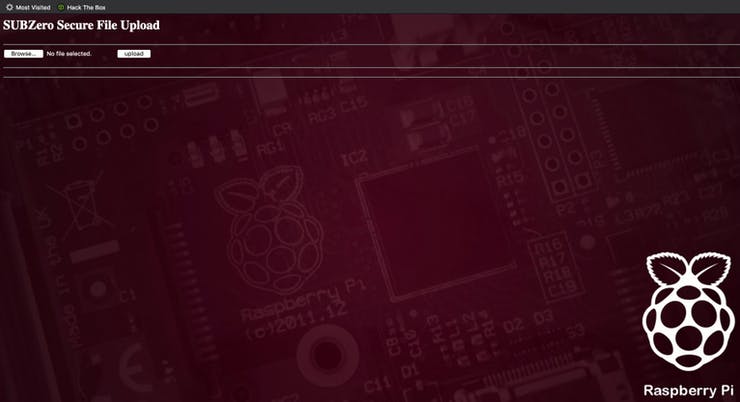
Just plug in the SUBZero to a USB port and it will broadcast a WiFi network named SUBZero (the default password is raspberry for WiFi, and pi:raspberry for the OS. PLEASE change this once it’s up and running). Once connected to the network, you can browse to https://192.168.1.1 and start uploading/sharing files. This functions as a standalone network, meaning no Internet connection required!.

What You Need
- Raspberry Pi Zero W
- Micro SD card
- Pi Zero USB Stem (Optional)
- Soldering Station (Optional)
- 3D Printer (Optional)
Installation
Flashing the Raspberry Pi Zero W with the SUBZero Image
The easiest way to get up and running with the SUBZero is by grabbing SUBZero image and flashing it onto an SD card. I recommend using Ethcher for flashing the SD card. Etcher is easy to use and works on Windows, OSX, and Linux.
Installing from source
To install the SUBZero on your Raspberry Pi Zero W, clone the SUBZero repository from my GitHub and run the install script.
$ git clone https://github.com/Halcy0nic/SUBZero.git
$ cd ./SUBZero
$ sudo chmod +x install.sh && sudo ./install.sh
During the installation, you will be prompted to enter data for the self-signed certificate. You can simply enter a ‘.’ or dummy data for all of the fields when generating the cert. Once you have installed the SUBZero, reboot the machine and you should see a WiFi Access Point named ‘SUBZero’ that you can connect to. Once connected to the SUBZero wireless network you can browse to https://192.168.1.1 and start uploading files.
NOTE: Your browser might complain about the cert being invalid (because it’s self-signed). Proceed to the webpage anyway and add an exception if necessary.
PI Zero USB Stem
According to Zerostem, the Pi ‘Zero Stem is a PCB shim that turns a Raspberry Pi Zero into a USB dongle. Once the shim is installed, your Raspberry Pi can be plugged directly into a computer or USB hub without any additional cables or power supplies.’ This is much more convenient than using a USB adapter, which would normally be required for a Pi Zero. Installing the Zero Stem will require some soldering experience, however. Once you have a Pi and Zero Stem you can turn it into a USB by soldering the STEM onto the Pi Zero using their instructions.
3D printed case
Lots of thanks go to Nick Engmann for this one. He developed the 3D printed SUBZero Case. Nick actively contributes to the SUBZero project and has some amazing projects of his own on his website, so go check him out!

Routing
By default, the SUBZero is not configured to route any traffic or provide internet access. Configuring the device to route traffic on the network is pretty simple though. I found a tutorial by Phil Martin showing how to do this. First, log in to the SUBZero using the credentials ‘pi:raspberry’ (you should change this) and open /etc/sysctl.conf as sudo with vim/vi/nano. Uncomment the line containing ‘net.ipv4.ip_forward=1’ by removing the # from the beginning of the line, save the changes, and return to the terminal. Assuming you are using wlan0 for your WiFi interface and eth0 for your internet connection, execute the following commands on the terminal:
$ sudo iptables -t nat -A POSTROUTING -o eth0 -j MASQUERADE
$ sudo iptables -A FORWARD -i eth0 -o wlan0 -m state --state RELATED,ESTABLISHED -j ACCEPT
$ sudo iptables -A FORWARD -i wlan0 -o eth0 -j ACCEPT
$ sudo sh -c "iptables-save > /etc/iptables.ipv4.nat"
Lastly open the file /etc/rc.local as sudo and add the following line at the bottom, right above exit 0:
iptables-restore < /etc/iptables.ipv4.nat
Expanding the Filesystem
By default, the Raspbian root file system is around 2GB. However, if you have an SD card with more capacity it’s a great idea to go ahead and expand your installation to the entire SD card. This way you can have the maximum amount of file storage on your SUBZero device.
To expand to the filesystem boot up the SUBZero device and open up a terminal and execute the following command:
$ sudo raspi-config

You will be presented with a GUI menu, go ahead and go down to “Advanced Options” and hit enter.

Then at the second menu hit enter on “Expand Filesystem”. You will them be prompted to restart your machine after the operation is over.
Conclusion
You can get all the latest updates and SUBZero news on my GitHub. This project is completely open source and free to use in any way you can imagine. You can get more information on Hackster, Hackaday, and Thingaverse. I love feedback and welcome contributions, so if you have cool SUBZero ideas, let me know!.
No responses yet